Build an eMarketing campaign for EZPix

Use an eMarketing campaign for crowdsourcing your school portraits and events.

23 STEPS

1. The first step to create an eMarketing email campaign is to open StudioBalfour and click Sell It! eMarketing from the bookmark section.

Step 1 image

2. Note: You can also access eMarketing by clicking Sales & Orders.

Step 2 image

3. Then click eMarketing.

Step 3 image

4. To create an email, click Launch New Campaign.

Step 4 image

5. Type in a Campaign Name.

Step 5 image

6. Type in an Email Subject.

Step 6 image

7. Emails can be sent now or scheduled to be sent later. If you wish to send an email at a later date, click Send Later.

Step 7 image

8. Click to change the date and time of the email.

Step 8 image

9. Let's cover Grades and Groups.

All available grades are pre-populated. Click the X to remove a grade. 

Groups is an options field, allowing you to filter down the students receiving a message. Click the down arrow to select a group. 

Step 9 image

10. Several optional group filters exist to target by buyer type, ad purchaser type, or by if they are featured in the yearbook or not. A combination of these allows you to customize the message to reach just the right audience. 

Step 10 image

11. Once you have customized the details of the message, click Save.

Step 11 image

12. Click Next to design the contents of the email.

Step 12 image

13. Click the down arrow next to Template Name to select a pre-designed template. 

Step 13 image

14. For this example, let's choose Yearbooks on Sale - Last Chance. 

Step 14 image

15. Your template will populate, allowing you to edit the body of the email. The Image and the "Order Your Yearbook" button are both linked to Balfour.com. If you wish to change this link, you can click the hyperlink icon on the toolbar to edit. 

Step 15 image

16. A great option is to include the direct URL to your school's online store. When finished, click Ok.

Step 16 image

17. If you wish to change the image, click the image icon on the toolbar. 

Step 17 image

18. Next to Source, click the folder icon to upload a new image. When finished, click Ok.

Step 18 image

19. We recommend sending yourself a test email.  Type in your email and click Send.

Step 19 image

20. When your email is ready, click Schedule.

Step 20 image

21. Click Yes to confirm.

Step 21 image

22. Now you're back on the eMarketing homepage. If you wish to edit a scheduled email campaign, click the pencil icon under Actions. 

Step 22 image

23. That's it. You're done.

Step 23 image

Here's an interactive tutorial

https://www.iorad.com/player/1644726/Studio-Balfour---How-to-create-an-eMarketing-campaign-email

Balfour's eMarketing system can be used for a variety of purposes including sending marketing emails, communicating with buyers, requesting school pictures (EZPix Portraits) and requesting event photos (EZPix Events).

The steps shown below are the same for all eMarketing purposes. 

  1. Log into StudioBalfour and select Sell It! eMarketing from the bookmarks section.
  2. From the eMarketing Dashboard, choose Launch New Campaign.
  3. Name your campaign. The name is for internal purposes only.
  4. Choose a Template from the drop-down menu. Several pre-designed templates are available. 
  5. Most templates requiring minimal editing. Replace any text shown in [SQUARE BRACKETS]. The information displayed In {CURLY BRACKETS} should not be edited as these are personalization tokens that will pull data from the Student List.  
  6. Once your message has been perfected, save it and choose next to select your eMarketing recipients and schedule your campaign.

Replacing Images in your eMarketing campaign

The images placed in a template can be replaced to further personalize your campaign. We recommend a pixel width no larger than 640 px.

  1. Click on the image and chose the Image button from the toolbar to edit.
  2. Upload a new image and insert it into the eMarketing campaign. 
  3. Ensure the image has a width no larger than 640 px. 

Replacing Links in an eMarketing campaign

Images and buttons in most of the sales campaigns are linked to Balfour.com. If you wish to include a direct link to your school store, you can click the link button on the toolbar to update the link. Be sure to update both the button and the image to ensure both links take the user to the same location. 

Important Note about EZPix Campaigns

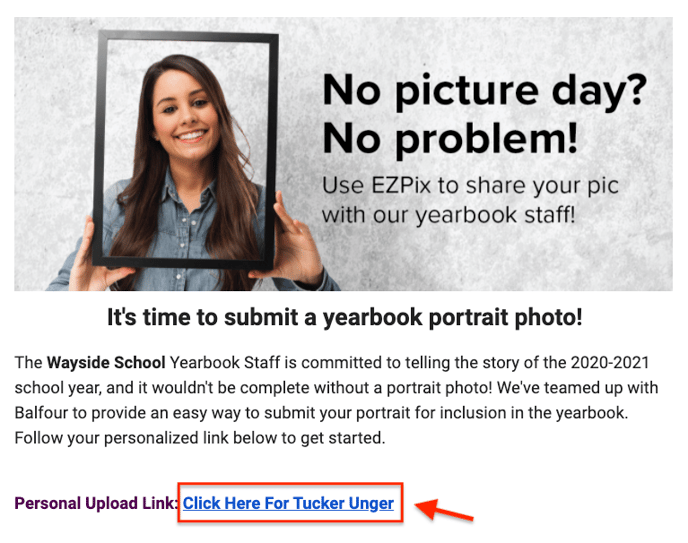
  • EZPix Portraits includes a unique link through the use of personalization tokens. When a campaign is deployed, the links will generate based on each recipient's student list data. This allows us to track which links belong to which users. Do not edit the data in the {CURLY BRACKETS}. Where you see {$portraitURL}, the email will display as shown below to the recipient. ezpix - link
  • EZPix Events campaigns also include a unique link that will generate when the campaign is sent. This unique link allows Balfour to tag the images uploaded by a user accessing a particular link. Do not edit the data in the {CURLY BRACKETS}. Where you see {$imagesURL}, the email will display as shown below to the recipient. 
    ezpix-events

When your campaign is ready to send, hit NEXT and continue to this next article for choosing recipients and sending your eMarketing campaign.