
Once you've designed your eMarketing campaign, you're ready to send or schedule your message. Once you've reached the Details section of your campaign, refer to the numbers and sections in the image below.
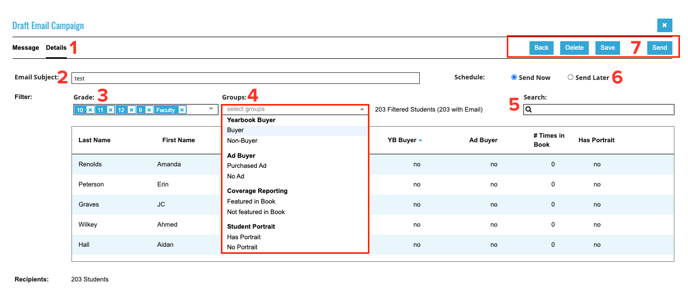
- Details - You can swap between designing your message or finalizing your sending details by clicking on the sections shown here.
- Email Subject - Give your email a catchy subject. Make sure it's short to prevent it from getting cut on certain email previews.
- Grade - eMarketing will pre-populate all the grades you've set up in StudioBalfour's Summary section. If you wish to remove certain grades, click the X to remove them.
- Groups - Filter your data by using Groups to further define your audience. Combining filters gives you more targeted messaging. (Think Non-Buyers who are Featured in Book).
- Yearbook Buyers - Choose from Buyers or Non-Buyers
- Ad Buyers - Chose from Purchased and Ad or No Ad
- Coverage Reporting - Choose from Featured in Book or Not Featured in Book
- Student Portrait - Use this for EZPix Portraits requests. Choose from Has Portrait or No Portrait.
- Search - Instead of using the Grades/Groups, you can search for specific students to send your message to, making it easy to target a short list of students.
- Schedule/Send - Send Now or Schedule your message to be sent later. If sending later, you can choose the date and time.
- Action Buttons - Once you are finished, hit Send to implement the schedule. Not ready to send yet? Just choose Save.