Creating Project and Content Folders
Before you start working with BalfourTools, you’ll need
two folders – a Project Folder to manage the project, and a Content Folder in which to keep your images and other yearbook content. The Project and Content Folders are usually placed on a network drive so everyone who is working on the yearbook has access to them.
Download a Project Folder from studio.balfour.com. It is included in the ‘Full’ download, or can be downloaded separately. The Project Folder has pre-sized page templates and subfolders that BalfourTools uses for your yearbook project. Do not delete any contents from the Project Folder. Make sure you download the *.ZIP file that matches your yearbook’s trim size (7, 8, 9). Extract the folder named ‘Yearbook_Project_xxxx’ to a location on your network that’s accessible to everyone, and rename it to something meaningful to your publication (ex: RHS_Yearbook_2020).
The Content Folder is located inside the Project Folder.
Rename this folder to your preference.
BalfourTools CC2015 or Newer:
- Download a Project Folder from studio.balfour.com. It is in the Asset Packs area on the CC 2015 or newer BalfourTools download page. Download the asset pack that corresponds to the trim size of your book. Extract the folder named “BalfourTools5_assets_X” to a location on your network that’s accessible to everyone, and rename it to something meaningful to your publication (ex: Yearbook_RHS_2020).
- The Content Folder is located inside the project folder included in the assets pack. Rename this
folder to your preference.
Windows users: Administrator permissions are required to finish the setup of your Project and Content Folders. To do this, right-click the InDesign program icon
and select ‘Run as administrator’.
Linking Your Project and Content Folders
After creating the Project and Content Folders, launch InDesign (as an administrator if using in Windows). In InDesign, click Window >
Extensions > BalfourTools. You’ll be asked to choose the Project and Content Folders you created previously. After choosing both, enter a unique Machine
ID (this identifies each computer for BalfourTools’ History and other admin features).

Do not remove or rename any folders or InDesign documents in your Project Folder.
Once your system is set up, your Content and Project Folders should not be moved. If you
need to change the location of these folders,
contact Balfour's Support Team for assistance.
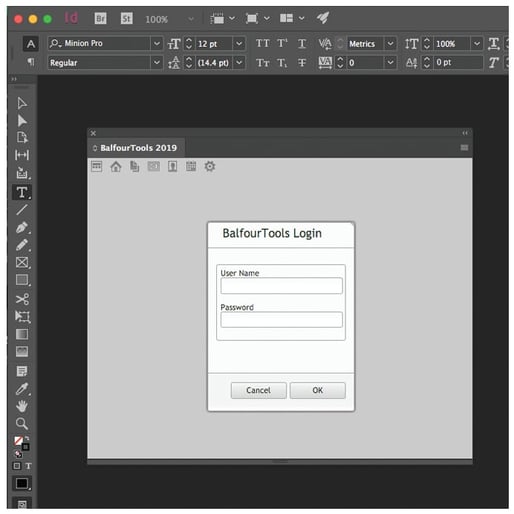
Logging In
When you are finished setting your folder locations, you’ll be prompted to log in to BalfourTools.
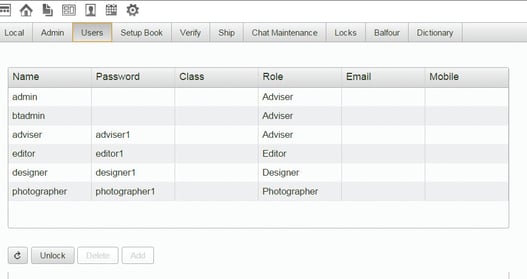
To log in as an administrator for BalfourTools the first time, enter admin as your user name (leave password field blank).
From the Navigation Icons, click the Setup icon. The Setup page displays a set of tabs. The types of tabs vary by user role. For every role, the Local tab is shown by default, and this is where you will see your folder locations and machine names. You can edit
those locations from this tab.
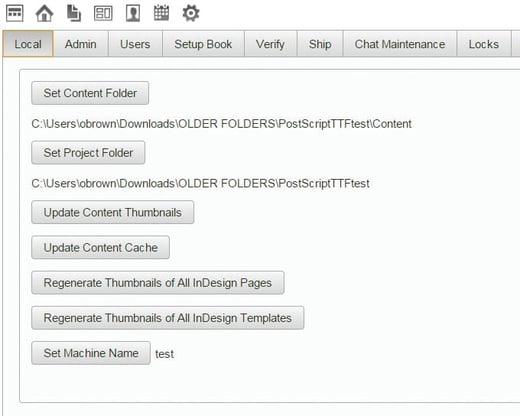
If you add your own templates, click the Update Content Thumbnails button. This allows you to view thumbnail versions of the templates when you are working in the Content Manager.
A convenient way to update all of your content thumbnails is to use the Regenerate Thumbnails of the InDesign Templates button. Only one user needs to do this, as this content is shared by all
users working on a network.
Setting up the Yearbook Project
Next, you need to set up the project information for your yearbook. This is done in the Admin tab on the Setup page.
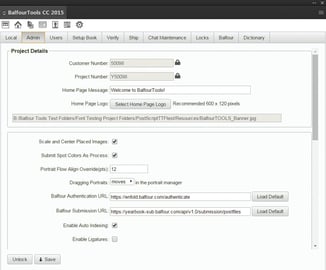
- Enter your Customer Number. This is a five-digit
number Balfour assigns to your school. - Enter your Project Number. This consists of your Customer Number plus the year to designate the current year (i.e., 0 for 2020). For example, if your Customer Number is 12345, your Project Number is 012345.
- If you want a message to display on your yearbook Home page, enter it in the Home
Page Message field. - Click the Select Home Page Logo button to change the image on your Home page. Your custom logo should be saved in the Setting folder of your project and be sized 600 pixels
wide x 120 pixels high. - Scale and Center Placed Images is selected by default.
- Submit Spot Colors as Process is selected by default.
- Portrait Flow Align Override is the max. variance (in points) that portrait frames can be offset – vs. others in the row – and still be auto-tagged in the correct order. The same variance is applied when detecting portrait text boxes (vs. captions). The default is 12 points.
- The Dragging portraits drop-down selection is Moves by default.
- Local Checkout is only required for CC2015 and Newer versions when the yearbook project is hosted on a network server.
- Auto Indexing is enabled by default. Ligatures, Automatic Byline and Custom Dictionary are defaulted off.
Do not change any of the defaults in the Admin tab (items 5-9 above) without
Adviser's authorization. - To prevent others from editing the information in the Admin tab, click the Lock button.
- Click the Save button to save your changes to the Admin tab.
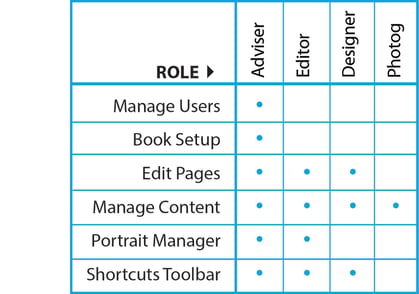
Managing Users
The primary login to BalfourTools enables adviser-level permissions, which allow complete access and control. You can manage your staff and set up multiple users and custom permissions in the Users tab in the Setup view.
The permission levels, defined in the chart below, are set for these roles:
- Adviser
- Designer
- Editor
- Photographer
What’s in the Project Folder?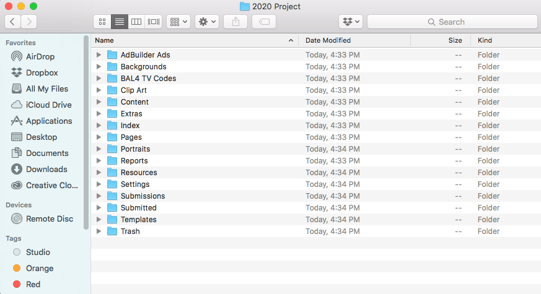
AdBuilder Ads
Use this folder to store AdBuilder ads you download from studio.balfour.com.
Backgrounds
Use this folder to store page backgrounds and other design elements you download from studio.balfour.com.
Bal4.tv Codes
Use this folder to store Bal4tv QR codes you create and download from Bal4.tv.
Clipart
Use this to store any clipart you download from Balfour’s Ultimate Clipart Collection at studio.balfour.com. You
can also add your own clipart to this folder.
Content Folder
Use this folder to store candid photos for use in the project.
Extras
This folder contains non-standard files that can be used to build other parts of the book, such as templates for
the cover, endsheets, gatefolds, and supplements.
Index
When you create an index for your yearbook, the files are stored in this folder. The files are saved here automatically when you generate the index. (Please see Creating the Yearbook Index section for more information.) The index templates are located in the Templates Folder.
Pages
The Pages Folder contains a folder for every spread in
the project created from the BalfourTools palette.
Portraits
The Portraits Folder contains portrait information. Nothing needs to be done to the contents of this folder outside of the Portrait Manager.
Reports
This is where any reports about the yearbook
project are stored.
Resources
This folder contains images, scripts, and other files needed for BalfourTools to function properly. Do not open or alter any files in this folder.
Settings
Settings that dictate how BalfourTools behaves are stored in this folder. Do not open or alter any files in this folder.
Submissions
The Submissions Folder is where all of your ready-to-submit files will be created, whether you are submitting PDFs or source files. When you click the Export PDF
button for submission, BalfourTools places the PDF in the Submissions Folder.
Submitted
This folder contains all of the files you have submitted
for production.
Templates
This folder contains hundreds of pre-designed Balfour templates organized into these categories: Academics, Classes, Clubs, Opening, Sports, Student Life and new theme-based Bonus Pack layouts. The Index templates are also stored here. Now that you’ve set up your project, it’s time to start setting up your yearbook.
Trash
Applying a template to an existing spread sends the original spread to the trash folder.