The Content Manager helps you manage the content (images and artwork) to be included in your yearbook. You can
view content files, search for content, add and remove content, and change the name of content files and folders.
The features of the Content Manager are shown and described below.

- Navigation Icons
Displays on every page in BalfourTools and provides easy navigation to the Shortcut Toolbar, Home View, Pages, Content Manager, Portrait Manager, History, and Setup. - Galleries Tab
Displays a list of all of the folders in the Content Manager. Any folder with content displays the number of items it contains in parentheses at the right of the folder name.
If a folder contains subfolders, you will see a small triangle at the left of the folder name. Double-click on the folder to view the subfolders. Then click on a subfolder to view the content files in the right pane of the Content Manager.
If a folder does not have subfolders, click on the name of the folder to view the content files in the right pane of the Content Manager.
You can switch the file view between thumbnails or a list by clicking on the Thumbnails or List tabs. - Filters Tab
Provides a convenient way to narrow your search for files in the Content Manager. For more information on how to filter, see the Filtering Content section below. - Content Menu
Determines which content types you view. The options are:
Content—Displays all of the content folders in the Content Manager.
Templates—Displays all of the template folders in the Content Manager.
Balfour Clip Art—Displays a folder containing any clipart you downloaded from Balfour’s Ultimate Clipart Collection at studio.balfour.com and any custom clipart you added to this folder.
Balfour Backgrounds—Displays a folder containing page backgrounds and other design elements you downloaded from studio.balfour.com. - Folders Pane
Displays a list of folders. The list varies by the sort you use in the Content Menu (see above). - Thumbnails Tab
Displays thumbnails of the files contained in the folder you selected in the Galleries Tab or the search results from the Filters Tab. - List tab
Displays a list of the files contained in the folder you selected in the Galleries Tab or the search results from the Filters Tab. - Add content
When you click the + icon under the Galleries Tab, you can add a new content folder to your yearbook project. Click the + icon under the right pane of the Content Manager to add a new file to the folder you select from the Galleries Tab. - Rename Content
Click the pencil icon under the Galleries Tab to rename a selected folder, or rename a selected file by clicking on the pencil icon under the right pane of the Content Manager. - Delete Content
Click the trashcan icon under the Galleries Tab to delete a selected folder and all of its content. To delete a file from a content folder, click the trashcan icon under the right pane of the Content Manager. Deleted content moves to the System Trash on the Mac and the Project’s Trash folder on Windows. - Refresh Content
To refresh the folder list, click the refresh icon under the Galleries Tab. Click the refresh icon under the right pane of the Content Manager to refresh the files displayed. - Rotate Pictures
To rotate an image 90 degrees left or right, click on a thumbnail image and click Rotate Right or Rotate Left. You may also select ‘Show Unused Photos Only’ to help reduce duplicate image usage.
Filtering Content
You can narrow your search for content by the photographer’s name or the date a picture was taken in the Filters Tab of the Content Manager. To filter content, select one of these options from the menu at the top of the Filters Tab. A list of the filtered items displays in the Filters Tab, and the files display in the right pane.
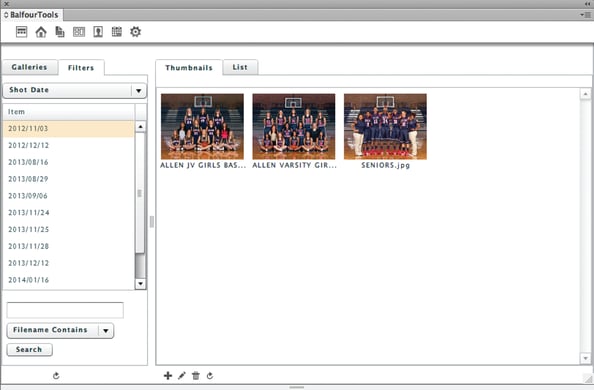
You can search for a partial or exact file name. To look for a partial file name, select Filename Contains from the menu under the Filters Tab, enter as much information as you remember about the file name, and click the Search button. Or to find an exact file, select Filename Equals from the menu, enter the complete file name, and click Search.