The features of the Portrait Manager are shown and described below. For information about how to use the Portrait Manager, please see the Using the Portrait Manager section.
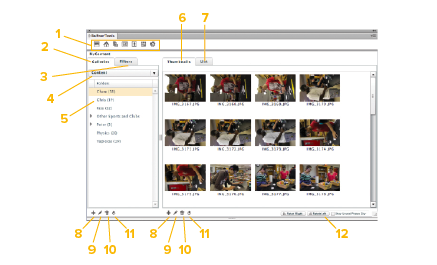
- Navigation Icons
Displays on every page in BalfourTools and provides easy navigation to the Shortcut Toolbar, Home View, Pages, Content Manager, Portrait Manager, History and Setup. - Add Photos
Adds a portrait or candid photo to the portrait collection. - Import Photos
Imports portraits or associated data to the portrait collection from a PSPA disc or a location on your network or computer. - Delete All Portraits
Deletes all of the portrait data and the portrait files from the project folder. - Show Omitted
When checked, displays portraits that have been omitted from the portrait collection. Omitted images display with a red “X” in the thumbnail view and in italics in the list view, and do not appear on pages. - List Tab
Displays a list of the portraits in the selected group. - Portrait Group
Displays the groups and number of portraits in each group of the portrait collection. - Thumbnails Tab
Displays thumbnail views of the portraits in the
selected group. - Delete Group
Removes a group from the portrait collection. - Add Group
Adds a group to the portrait collection. - Group Tab
Displays information about the selected portrait group. - Portrait Tab
Displays information about the selected portrait. - Add Field
Creates a field for all portraits in all groups. Note that the Portrait column must be active for fields to be added. - Delete Field
Removes a field from all portraits in all groups. - Unlock/Lock Editing
Click to unlock the portraits and portrait information for editing. When the editing is completed, click this icon to lock the portraits from further changes. When the portraits are unlocked for editing, the icon changes to an unlocked padlock. When the portraits are locked, the icon displays as a locked padlock. - Delete
Removes selected portraits from the portrait group currently being displayed. This does not affect the portraits, only their membership in the selected group. - Omit
Omits selected portraits from the selected group. Omitted portraits do not flow, but they remain available and can be restored later, if necessary. - Remit
Stops omitting the selected portraits from the selected group and reintroduces them for flowing. - Change Picture
Assigns a different portrait to the selected portrait. - Display
Displays the portrait collection or group according to the field selected from the dropdown list. The field names correspond to the list that appears when the Portrait side of the bottom panel is active. - Navigation
Shows the current page displayed. Use the navigation buttons to move to the next/previous, or first/last pages. - Portraits Displayed Message
Shows the number of portraits displayed in the selected group. If the All group is selected, then the total number of portraits displays. Before flowing portraits, you must tag frames and text boxes to direct the software where to place your names and images. There are two ways to do this – tag existing frames or create and tag new frames. You must have a PSPA disk loaded before tagging spreads. - Proof Portraits
Creates a PDF directory (thumbnail) proof of the
selected portraits.