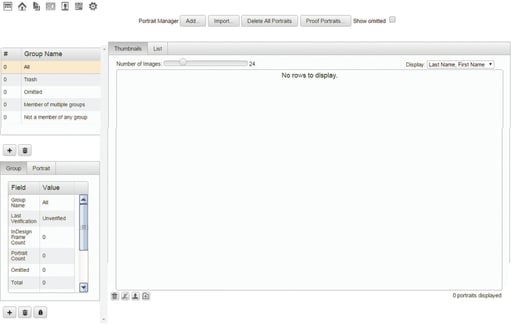
The Portrait Manager allows you to import portraits, manage your portrait information and prepare portraits for flowing into pages. Launch the Portrait Manager by clicking the Portrait Manager icon from the Navigation icons.
Importing Portraits
The first time you launch the Portrait Manager, the Portrait Collection is empty.
You need to import portraits into the Portrait Manager from a PSPI disc. To import portraits:
- Insert the PSPI disc into your computer’s CD drive (If your photographer provides a digital download, skip this step.).
- In the Portrait Manager, click the Import button.
- Browse until you locate the index.txt file from your PSPI disc and click OK. When the photos finish importing, a message displays confirming the number of photos that were imported successfully and the portraits display in the Portrait Manager.
Managing Portraits
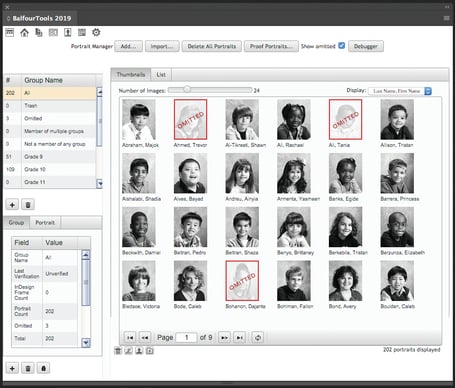
Once you upload portraits into the Portrait Manager, you can edit individual portrait information, add or omit portraits, and group portraits according to sections in the yearbook. You can select different ways to display and to sort the portraits.
Displaying and Sorting Portraits
You can display and sort portraits in a variety of ways by using the Display and Sort By menus at the bottom of the portrait collection. The default for both menus is Last Name, First Name.

Adding a Portrait
- Click the Add button to open the New Portrait window.
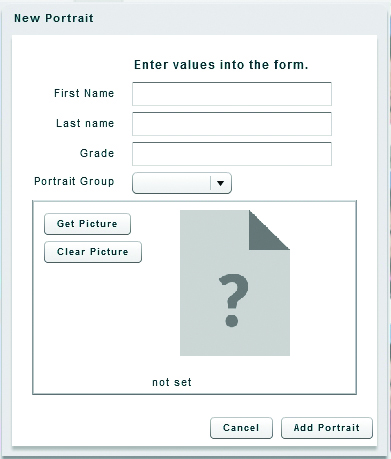
- Click the Get Picture button to add a new portrait.
- Navigate to the portrait and select it.
- Enter the person’s First name, Last name, and Grade in the corresponding fields in the New Portrait Window. Then assign the portrait to a Portrait Group.
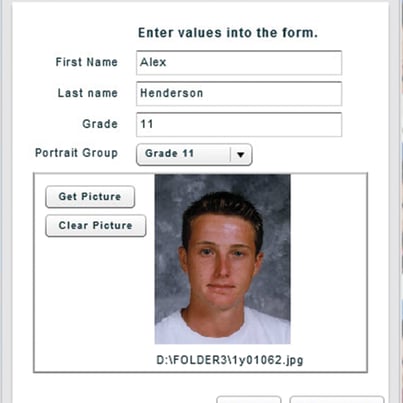
- Click the Add Portrait button to place the portrait in the
portrait collection.
Replacing and Removing Portraits
To replace an existing portrait with a new image, click the folder icon at the bottom of the Portrait Manager view.
![]()
To remove a portrait, click the second trashcan icon at the bottom of the Portrait Manager view. This deletes the portrait from a group but does not remove it from the
portrait collection.
![]()
Omitting and Remitting Portraits
To omit a portrait from the portrait collection, click the Omit icon at the bottom of the Portrait Manager view.
![]()
Omitted portraits will not be deleted but will become part of the ‘omitted’ portrait group. Check the Show Omitted box to view omitted portraits as part of the All group, or the group the student belongs to.
Note: Select individual or continuous multiple portraits
using the CTRL/CMD or SHIFT keys, respectively.
Clicking the Remit icon restores the omitted portrait.
![]()
Viewing Portrait Details
Click on a portrait to view details. The details about the portrait display in the Portrait Tab at the bottom left of the Portrait Manager view.
To edit the information about a portrait:
- Verify that the padlock icon at the bottom of the Portrait Manager view is unlocked. If it is locked, click it to unlock the information for editing.

- In the Portrait Tab, click on a name, grade or other information to edit portrait information, and press Enter when you are finished.
Managing Groups
BalfourTools organizes and flows portraits by groups.
Initial groups are created based on information from
the PSPA disc, but you can create and manage groups
using the Portrait Manager.
Adding a Group
- Click the Plus Sign icon above the Group Tab.
- Enter the group name and click OK to add the group. The group appears in the Portrait Groups area.
- Add portraits to populate the group.
Portraits may appear in Member of Multiple Groups or Not a Member of Any Group. Manage portraits in these system-defined groups just like
the other user-defined groups.
Deleting a Group
- Select the group to delete under Portrait Groups.
- Click the trashcan icon directly below the Group Tab.
- Click Yes to delete the group.
- Portraits from the deleted group will become Not a Member of Any Group and can then be moved to other groups.
Creating Styles
The Caption Expression field in the Group Tab enables you to format how the portrait identification information flows. The default is First name Last name in 8-point Times.
To change identification to Last name, First name:
- Use the keyboard/mouse to change the order of the name tags:
<last name><first name>. - Add a comma and a space between the tags.
- To add emphasis, add tags around the names:
bold <b>name</b>
italic <i>name</i>
underline <u>name</u> - Press Enter when you are finished.
When you create a portrait page using BalfourTools, it places a Portrait Style in the InDesign Paragraph
Styles panel. Use this style to further format portrait identification entries.